How to make a REST callout/integration from Salesforce to Github REST API

Usually to integrate with an external system that supports REST API, you need to make REST callouts from Salesforce. This blog demonstrates how to make a REST callout from Salesforce to Github.

Demo


Code Sample


//Integration with Github API
public class GithubApi {
public static String getGithubUserDetails(String githubUserHandle) {
Http http = new Http();
//Create a HttpRequest instance
HttpRequest request = new HttpRequest();
request.setEndpoint('https://api.github.com/users/'+githubUserHandle);
request.setMethod('GET');
// Make the API call and get response
HttpResponse response = http.send(request);
String responseString = response.getBody();
//Usually you get response from REST APIs in String format
//You can process these resonse
return responseString;
}
}
view raw GithubApi.cls hosted with ❤ by GitHub

Steps

  • Add remote site settings
  • Create GithubApi class with a method to make API call
  • Copy code from code snippets and save class
  • Execute the class in developer console using System.debug(GithubApi.getGithubUserDetails('SalesforceCodes'));

How to customize Salesforce lightning community layout - Custom Theme layout

Salesforce lighting community comes with a number of predefined layouts. But most of the times these layouts do not match your requirements/company branding. In this blog we will go through how we can customize the layout of a Salesforce lightning community. It is done by creating "custom theme layout" using aura components.

Use cases

  • Provide better user experience and branding through Salesforce lightning community
  • Build a custom, mobile responsive layout that is not available in standard predefined templates like Napili template.

<aura:component implements="forceCommunity:themeLayout">
<aura:attribute name="header" type="Aura.Component[]"/>
<aura:attribute name="footer" type="Aura.Component[]"/>
<div class="custom-wrapper">
<div class="slds-grid slds-grid_vertical-align-center" style="border: 1px solid red;">
<div class="slds-col">
<span>Company Logo Here</span>
</div>
<div class="slds-col">
{!v.header}
</div>
<div class="slds-col">
<span>Header right content</span>
</div>
</div>
<div class="content">
{!v.body}
</div>
<div class="slds-grid slds-grid_vertical-align-end" style="border: 1px solid red;">
<div class="slds-col">
<span>Footer left</span>
</div>
<div class="slds-col">
{!v.footer}
</div>
<div class="slds-col">
<span>Footer right</span>
</div>
</div>
</div>
</aura:component>

Explanation

Here we are creating a custom theme layout that we can use to customize the layout of community pages. First step is to create an aura component that implements forceCommunity:themeLayout interface.
Now as part of the layout, you might have some things that are static between different pages (For example company logo on top left). Also you might have some content that changes between different pages in the community that uses the layout. All static content that doesn't change between pages like logo can be directly coded into the layout itself. Then you need to create attributes that are array of aura components to make some sections dynamic. In the above example we are defining a header attribute at line 2 as an array of Aura.Component. Then we use that attribute on line 10 using the syntax {!v.header}. This simply says that When the layout is renderd in community builder, provide a drag and dropable area of lightning components at line 10.

How to use

  • Create an aura component with name MyCustomLayout
  • Copy paste above code into the component.
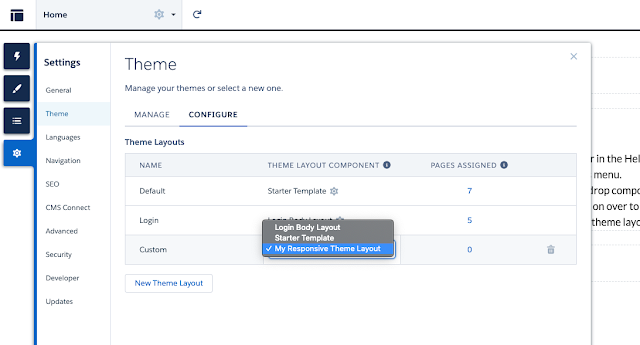
  • Go to the design file of the aura component (MyCustomLayout.design) and give a title you like in the opening tag like design:component label="My Responsive Theme Layout"
  • Now go to your lightning community builder theme settings and define a theme layout, Setup => All communities => Builder => Gear icon in left floating menu => Theme => Configure Defining Theme Layout
  • Once you have defined a custom theme like this, you will be able to use that in any existing community builder pages or new community builder pages that you create
  • To use the new layout in an existing community page, simple select settings of the page and check "Override the default theme layout for this page" option at the bottom.
    Changing theme layout of existing page

How to create a scratch org with "Non Profit Starter Pack (NPSP)"

Salesforce scratch orgs makes it very easy to track metadata changes. But if you are developing an app that involves non profit starter pack, it is usually tricky to setup a scratch org with NPSP packages. In this blog, we will go through different steps needed to setup a scratch org with NPSP packages.
NPSP is basically a combination of multiple appexchange packages. But to install these your sandbox/scratch org needs to meet certain conditions. These prerequisites are adding certain recordtypes to Account and Opprotunity and adding an Opprotunity sales process. Metdata needed for these can be found in the link - https://github.com/SalesforceFoundation/NPSP/tree/master/unpackaged/pre. If you wish to run below bash script directly, you need to copy individual metadata files from above NPSP github repo into a single npsp-dependencies folder in deployable format with a combinted package.xml file.

Use cases

  • Easy development of enhancements to NPSP in scratch orgs
  • Other approaches like using Cumulus CI are usually more time consuming and difficult to setup

#!/bin/bash
# Make sure that you have set an org as default dev hub. Usually your production environment will be your devhub environment.
#sfdx force:config:set defaultdevhubusername=productionUsernameHere
echo "Creating scratch org"
sfdx force:org:create -s -f config/project-scratch-def.json -a myScratchOrg -d 30
sfdx force:org:open
# Before running below line, copy content from inner folders in the github location -
# https://github.com/SalesforceFoundation/NPSP/tree/master/unpackaged/pre
# and create a single folder "npsp-dependencies" with account, opportunity object files and a combined package.xml
echo "Deploying pre dependency for NPSP packages"
sfdx force:mdapi:deploy -w 100 -d ./npsp-dependencies -u myScratchOrg
echo "(1/6) NPSP Installing Contacts & Organizations 3.7.05"
echo "y" | sfdx force:package:install -p 04t80000000gYcfAAE -w 15 -u myScratchOrg
echo "(2/6) NPSP Installing Household 3.9.0.8"
echo "y" | sfdx force:package:install -p 04t80000000jYrOAAU -w 15 -u myScratchOrg
echo "(3/6) NPSP Installing Affiliations 3.6.0.5"
echo "y" | sfdx force:package:install -p 04t80000001AVBMAA4 -w 15 -u myScratchOrg
echo "(4/6) NPSP Installing Relationships 3.6.0.5"
echo "y" | sfdx force:package:install -p 04t80000000tpCGAAY -w 15 -u myScratchOrg
echo "(5/6) NPSP Installing Recurring Donations 3.10.0.4"
echo "y" | sfdx force:package:install -p 04t80000000tpCBAAY -w 15 -u myScratchOrg
echo "(6/6) NPSP Installing Nonprofit Success Pack 3.116.0.5"
echo "y" | sfdx force:package:install -p 04t1Y000001I8yUQAS -w 15 -u myScratchOrg
echo "if any installation failed, retry it by running corresponding command."
echo "pushing package code"
sfdx force:source:push -f
view raw npspsetup.sh hosted with ❤ by GitHub

Explanation

Above shell script will work for Mac and Linux users only. If you are a windows user, you might need to copy-paste and run individual commands separately from windows command line. As part of this script we are first creating a scratch org. Then we open the scratch org in browser. After that at line 14 we install all the prerequisites for NPSP package. Then we install 6 NPSP appexchange packages one after another. Please note that in future Salesforce might upgrade these packages and the package IDs will change. In that case find package ID corresponding to the upgraded version and change in the script.

How to use

Make sure that you are inside an sfdx project folder. If not, create a SFDX project using vscode or SFDX cli sfdx force:project:create -n projectName. As first step, make sure that you have copied all dependencies from https://github.com/SalesforceFoundation/NPSP/tree/master/unpackaged/pre to a folder with name npsp-dependencies inside your repository. Make sure you have set a devhub environment as default that you can use for spinning off scratch orgs( sfdx force:config:set defaultdevhubusername=productionUsernameHere ). Copy above code into a shell script file. *Example createScratchOrg.sh) Make sure that your shell script file has proper permissions by running chmod u+x createScratchOrg.sh. Finally run the shell script from terminal using ./createScratchOrg.sh.
Since it is installing 6 different appexchange packages as part of NPSP, the whole process might take some time. You can see the progress.

How to connect to Salesforce metadata API from a Visualforce Page

Meatadat API allows you to connect to Salesforce to create, modify and delete Salesforce metadata. This API is designed for external systems/clients to connect to Salesforce. But there will be use cases where you need to connect to metadata API from Salesforce itself and make changes to the metadata in same org/sandbox.

In this blog we will go through creating a custom visualforce page that you can use to connect to Salesforce metadata API and create objects in Salesforce.

Use cases

  • Update metadata(create objects, create fields, page layouts etc) from visualforce
  • To provide a single user interface for admins to do different actions that otherwise would require going through different setup sections (Example :- post installation setup of complex appexchange apps)

<apex:page>
<apex:includeScript value="https://cdnjs.cloudflare.com/ajax/libs/jsforce/1.9.1/jsforce.min.js" />
<script>
//Initializing jsforce library with session token
var conn = new jsforce.Connection({ accessToken: '{!$Api.Session_ID}' });
//Method to create object
function createObject() {
let objLabel = document.querySelector('#objLabel').value;
let objApi = document.querySelector('#objApi').value;
if(!objApi || !objLabel) {
alert('Please enter a label and api name');
return;
}
var metadata = [{
fullName: objApi,
label: objLabel,
pluralLabel: objLabel,
nameField: {
type: 'Text',
label: 'Name'
},
deploymentStatus: 'Deployed',
sharingModel: 'ReadWrite'
}];
conn.metadata.create('CustomObject', metadata, function(err, result) {
if (err) { alert(JSON.stringify(err)); }
if(result) {
alert(JSON.stringify(result));
}
});
}
</script>
<div style="margin:100px;">
<b>Object Label</b> &nbsp;
<input type="text" id="objLabel" placeholder="Please enter a label"/><br/>
<b>Object API Name</b>
<input type="text" id="objApi" placeholder="Value with __c" /><br/>
<input type="button" onclick="createObject();" value="Create Object"></input>
</div>
</apex:page>
view raw metadata.html hosted with ❤ by GitHub

Explanation

We are using jsforce library to interact with Salesforce metadata. In this particular example we are creating a custom object in Salesforce. First we load jsforce library from CDN using apex:includeScript tag. Then we initialize salesforce connection in jsforce library with logged in user's session id. createObject function reads label and API name of desired object from HTML input tags and calls jsforce method available on connection instance conn.metadata.create. We are passing metadata type, object metadata as a JSON array and a callback function to this method. Once Salesforce has processed the request, callback will be called with error/success response. To simplify things we are just alerting the result we are getting in the callback. But we can definitely build a good user interface and provide complex metadata manipulation functionalities using the ability to interact with metadata.

Creating an object is just an example usecase. You can do a lot more things with jsforce library. Examples can be found in jsforce documenation. jsforce metadata


How to use
  • Create a visualforce page in your org
  • Copy paste above code into your page. There is no controller or other dependencies.
  • Go to below url to see the resulting page
    {{yourSalesforceBaseUrl}}/apex/{{NameOfThePageYouCreated}}